Section outline
-
-
There are many annotation tools like CVAT, Label Studio or Roboflow but here, we will use the last mentioned.
Let's go to Roboflow website.
The Roboflow website is quite intuitive, so it’s easy to navigate. However, we will focus on the key steps. Start by creating an account, then follow the steps below.
Before continuing with our data annotation, we have to go through theoric explanations.
Earlier, we saw the importance of having a wide variety of data. However, it’s not always easy to gather many images of an object from every angle. That’s why it’s possible to digitally process images to apply variations to them.
There are two types of data modification: preprocessing and augmentation. We’ll go over the purpose and nuances of each of these steps.
Preprocessing
Preprocessing is a treatment we apply to our images for various reasons.
Let’s start with our base images (the ones we just annotated). Let’s say we have a number x of them.
Preprocessing is applied to all base images, so before preprocessing, we have x images, and after preprocessing, we still have x images. Preprocessing does not change the number of images. However, it modifies the base images, so we "lose" the original images since we only keep the modified versions.
Here are a few examples of preprocessing and their purposes:
- Resizing: Very useful for making our dataset uniform. We’ll come back to this later.
- Grayscale conversion: If colors are not relevant, converting images to grayscale saves storage space. Note: Only grayscale images will remain; the original color images will no longer be available.
Augmentation
As its name suggests, augmentation allows us to expand our database. The main benefit is to diversify the images, as shown in the diagram below: instead of having just one image of a cat in the "correct" orientation and in color, we apply transformations. The name above each image corresponds to the operation applied. This way, the model will be able to recognize a cat even if it is in grayscale or upside down.
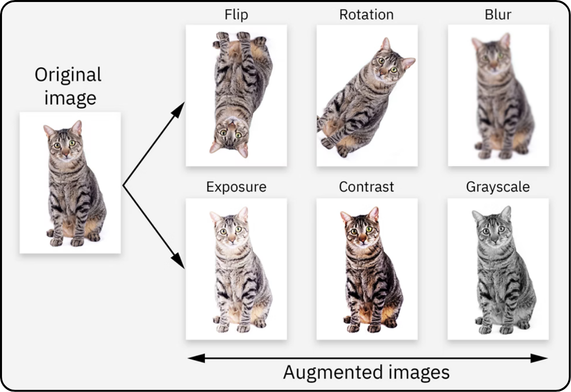
After augmentation, we have more data than we started with. For example, if we take x as our initial number of images and apply the 6 transformations shown in the diagram, we will end up with x + 6x = 7x images (the original x images plus 6 transformed versions of each).
To revisit the preprocessing example : if we add grayscale conversion during augmentation, we will have both the original images and their grayscale versions, effectively doubling the number of images. The model will then train on both the color and grayscale images (unlike preprocessing, where the color images are replaced and no longer available).
How to choose ?
Depending on your use case, you can choose to perform preprocessing and/or data augmentation, as we’ve seen. However, these changes can be applied either upfront (before training) or during training.
If changes are made upfront:
- All variations of the original images will be created, potentially using a lot of storage space.
- However, the model will only need to access these pre-generated images, making training faster.
- Upfront changes are done on Roboflow.
If changes are made during training:
- All variations of the original images will be generated on the fly and stored only temporarily, so it won't need much storage space.
- This will require additional computational time, as the model (YOLOv26, the AI model we’ll use later) must generate images during training.
- YOLOv26 has default augmentation parameters, so augmentation can happen automatically without manual configuration.
Key Considerations
- Roboflow allows you to see exactly what transformations are applied and customize them step by step which can be handy.
- YOLOv26 applies many transformations by default. Thus, if you want or need to disable them, you’ll need to manually adjust each one, which can be tedious.
Recommendations
- If you’re a beginner, it’s recommended to avoid augmentation on Roboflow since YOLO already handles it (though you can still do preprocessing if you want). This way, you won’t need to dive into understanding every transformation.
- If you do not know what to choose, the main factor in deciding how to apply augmentation is computational resources:
- If you have plenty of resources (e.g., working on a cluster), you can let YOLO handle more computations.
- if you’re on a personal machine with limited resources, prefer doing augmentation on Roboflow. This will use more storage but speed up training. In this case, remember to disable YOLO’s many augmentation parameters to avoid distorted data due to combined transformations (a script to disable everything will be provided when needed).
-