Section outline
-
To achieve our goal of building an artificial intelligence system for object detection, we need a model. You can think of it as a brain, composed of neurons that must be trained to perform the required task. Designing such a “brain” from scratch is not trivial, which is why we rely on models developed by professionals. Our task is then to train these pre-built neural networks.
In this case, we will use the YOLO (You Only Look Once) models developed by Ultralytics. Several versions exist, as the project continues to evolve, and we will use the latest available version, namely YOLOv26.
To begin, we need a Python environment.
To avoid any environment-related issues, we will create a virtual environment together on your computer.
For those who are not familiar with this concept, a virtual environment is somewhat like having several apartments inside a large house. Each apartment is independent, self-contained, and fully functional on its own. The idea is that when a new tenant arrives, they have their own private space where they can do whatever they want, without being affected by the rules or constraints of the others.
It works the same way for us: we want our code to run smoothly without interfering with the rest of the system. So we create a kind of “virtual mini-computer” inside the physical computer.
Installation of uv
To create this virtual environment, we will use a tool called uv. You can think of it as both the architect and the construction team of the “house”: it is the tool that knows how to design and build environments.
We will therefore start by downloading it.
For Windows :
For Linux/macOS :
Setting up the virtual environnement (often called venv)
Now the tool for creating a virtual environment is installed (the architect and construction team have arrived). We now need to design the “floor plan” of our environment by specifying everything we need. This is exactly what we will do in a .toml file, which we will create together.
In this file, we will specify that we need Python and the Ultralytics package.
Start by opening a text editor (for example Notepad on Windows).
Then, in a blank file, copy and paste the following lines:
[project]name = "your_project_name"version = "0.1.0"description = "Add your description here"readme = "README.md"requires-python = ">=3.12"dependencies = [ "ultralytics>=8.4.18", ]Then click “Save As”:
-
Go to your working directory (the folder where you extracted your Roboflow .zip archive)
-
In “Save as type”, select “All files (.)”
-
In “File name”, enter pyproject.toml (this name must be exact and cannot be changed)
-
Finally, save the file.

Important point: make sure that “.toml” is indeed the file extension. To do this, you first need to display file extensions:
Go to View → Show (at the bottom) → File name extensions, then check that the file name ends with “.toml”.
Python code
Now, create a Python file in the same folder, using the same method as before:
-
Open a text editor
-
Write the three lines below (you can copy-paste them)
-
Click “Save As”
-
Set the extension to .py (same process as before, but instead of .toml, use .py)
The lines in question:
from ultralytics import YOLOmodel = YOLO(“yolo26n.pt”)results = model.train(data=”data.yaml”, epochs=100, imgsz=640)Explications
-
-
model = YOLO(“yolo26n.pt”)
-
This line is used to specify which model you want to train. In this case, we can see that a “nano” model is being used because there is an “n” after “yolov26”. YOLO provides five model sizes: nano (“n”), small (“s”), medium (“m”), large (“l”), and extra-large (“x”). Intuitively, smaller models are faster but less accurate, while larger models require more computation time but are more robust and powerful.
These models are pre-trained to save both training time and to improve performance.
(For advanced AI users, YOLO also allows you to build your own neural network by manually defining each layer in a .yaml file — see the official documentation)
-
-
results = model.train(data=”data.yaml”, epochs=100, imgsz=640)
-
data: set this to the name of your
.yamlfile provided in the Roboflow.zipexport.epochs: epochs correspond to the number of training cycles. To put it simply, the model goes through all images in the training set and updates its parameters. The number of epochs defines how many times it will iterate over the entire dataset.
imgsz: this refers to the size of your images, so you should use the same value you selected in Roboflow. The default value is 640, so if you want larger or smaller images, you must explicitly specify it; otherwise, images will be resized (downscaled or upscaled) automatically.
To give you some typical parameter benchmarks:
- model:
yolo26n.pt(Nano version for speed) oryolo26s.pt(Small version for accuracy). - epochs: 100 is the default value. For small datasets, you can increase it to 300.
- imgsz: 640 is the default value. Use 320 for faster processing or 1280 to detect very small objects.
- batch: -1 for automatic adjustment based on your VRAM, or 16 by default.
- device: 0 to use your first GPU, or
cpuif you don’t have one.
Regarding model size, it is recommended to switch to a larger model than
yolo26s(such as the m, l, or x versions) in the following situations:- Need for maximum accuracy: If your current model suffers from underfitting and fails to capture complex details, a larger model offers greater learning capacity.
- Dataset complexity: For large datasets (> 50,000 images) with many classes or dense scenes, Medium or Large models perform better.
- Difficult objects: If you are working with high-resolution images containing very small objects (such as aerial or medical imaging), the increased capacity helps reduce detection errors.
- Sufficient hardware resources: Use a larger model if deployment is on a server (such as the ISDM MESO cluster) or a powerful GPU rather than on mobile or CPU.
Other useful parameters of the model.train() function
Argument Type Default Description
time float None Maximum training time in hours. If set, this overrides the epochsargument, allowing training to automatically stop after the specified duration. Useful for time-constrained training scenarios.patience int 100 Number of epochs to wait without improvement in validation metrics before early stopping the training. Helps prevent overfitting by stopping training when performance plateaus. device int or str or list None Specifies the computational device(s) for training: a single GPU ( device=0), multiple GPUs (device=[0,1]), CPU (device=cpu), MPS for Apple silicon (device=mps), Huawei Ascend NPU (device=npuordevice=npu:0), or auto-selection of most idle GPU (device=-1) or multiple idle GPUs (device=[-1,-1])project str None Name of the project directory where training outputs are saved. Allows for organized storage of different experiments. name str None Name of the training run. Used for creating a subdirectory within the project folder, where training logs and outputs are stored. exist_ok bool FALSE If True, allows overwriting of an existing project/name directory. Useful for iterative experimentation without needing to manually clear previous outputs. These parameters are basic settings used to customize your training. However, to further improve performance, there are additional parameters that can be adjusted. We will cover these later in the course, although for beginners, the default settings of YOLO already provide very good results.
Augmentation
We have now reached the point where you may need to disable YOLO augmentation, if necessary.
If you have already performed augmentation with Roboflow and do not want YOLO’s augmentation to interfere, add the blue-highlighted lines below.
Make sure to keep your initial parameters such as data, epochs, imgsz, etc :
model.train(
data="data.yaml",
epochs=100,
imgsz=640,
hsv_h=0.0, # Disable color (Hue)
hsv_s=0.0, # Disable color (Saturation)
hsv_v=0.0, # Disable color (Value)
degrees=0.0, # Disable rotation
translate=0.0, # Disable translation
scale=0.0, # Disable scaling
shear=0.0, # Disable shear
perspective=0.0, # Disable perspective
flipud=0.0, # Disable vertical flip
fliplr=0.0, # Disable horizontal flip
mosaic=0.0, # Disable mosaic
mixup=0.0, # Disable mixup
copy_paste=0.0, # Disable copy-paste
auto_augment=None, # Disable auto-augment policies
erasing=0.0 # Disable random erasing
)
Otherwise, if you have not performed any augmentation with Roboflow, the simplest approach is to let YOLO handle augmentation by default. In that case, do not include any of the blue lines above, as we want these parameters to keep their default values.
Final step check
Your working folder should look like this by the time you've arrived here :
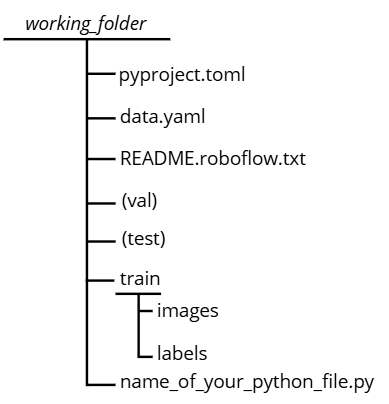
Note: there may be variations in the train, val, and test files depending on how you organized your dataset. The most important point is that the
data.yamlfile remains consistent with the corresponding paths.Run the code
Everything should now be ready, so you can run the code. To do this:
-
Go to your working directory
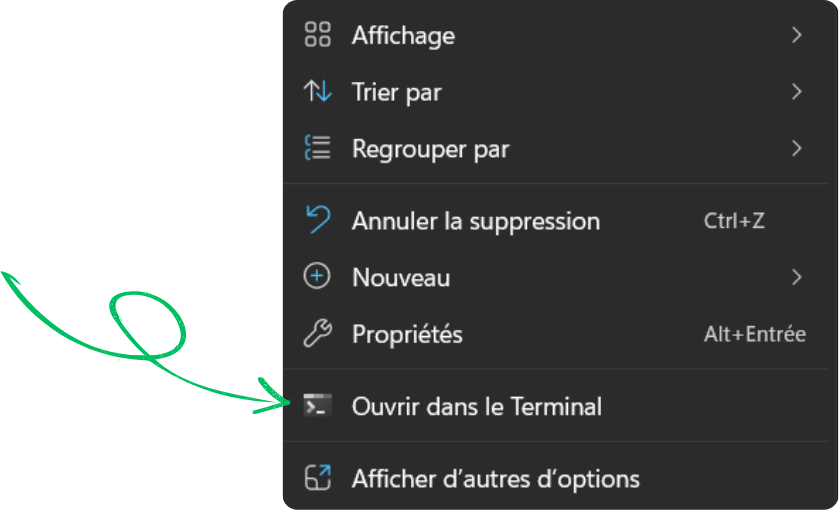
-
Right-click and open a terminal in that folder
(If you are on macOS, open a terminal as shown previously, then enter:
cd /absolute/path/to/your/work/folder)In the terminal, type the following command and press Enter:
uv run your_python_file_name.pyThe very first time you run this command, it may take a long time. This is because before executing your Python script, the system needs to read the project configuration file (
pyproject.toml) and instruct uv to build everything required by the environment (Python, Ultralytics, etc.).Once everything is installed and set up, the environment is created. From the second run onward, the same command will execute much faster since everything is already in place.
When your training ends, you will need to evaluate its quality. In the next 'Results' section, you will learn about all the elements that YOLO calculates at the end of its training and how to understand it. However, if you just need to know whether your model is good without understanding the details, you can go directly to the 'Conclusion' subsection under 'Results'.
-